I used a strip from the top of a pallet from work. Routed a channel along the upper part for the cables, and drilled three holes for the cables to connect to the light fittings. I purchased three fisherman's lights for this, which went with the theme of the kitchen. Trimming the cables to fit, after I had sanded and stained the wood, I connected the cables together into a block connector. This was pushed through a small hole in the ceiling. I then used six small bolts, for an industrial look, and bolted the fitting into the ceiling. And there you have it. I, along with everyone who has seen it, really like it. Hope you do. It took me a couple of hours to do this, using three fisherman's lights, a strip of pallet wood, and six bolts. Very easy to do.
Even if you are used to working with pallets, I'm sure this contemporary house will not leave you indifferent. It is proof that pallet's little vintage side fits perfectly in different styles. For this house, the approach has been to integrate a little touch of pallets in every room: the entrance with this message, the design of a full wall, the kitchen bar and some little pieces of furniture.
In my unique furniture designs, I enjoy using both hardwoods and steel. When a nearby shop opened to feature local arts and crafts, I knew I'd have to make a variety of products have broader appeal. I have a few recent designs which are selling well at the shop; coat racks, the 'Range Rack' and two versions of napkin holders. Today I'll focus on the napkin holders which are quite easy to make. After harvesting slats, I rip them to 2.5" wide and plane and/or sand them to remove any splinters. I cut the inside pieces to 7" lengths, the sides 7.5", or 10" depending on which model and then assemble with Titebond II would glue and a pneumatic stapler. On the model that includes salt & pepper shakers, I use recycled 1/4" plywood for the bottom panel. I use a mixture of stain and boiled linseed oil for finishing the projects.
Here is the table I made with benches. I assembled for reinforcement beams recovered from plasterboards pallets. For the tray, I only used boards from EURO pallets. I sanded a lot, then re-stain the boards individually (5 different colors). Same treatment for benches.
Coin repas Table avec bancs. Pour l'armature j'ai assemblé des poutrelles récupérées sur des palettes de plaques de plâtre. Pour le plateau uniquement des planches récupérées sur des palettes Europe. Beaucoup de ponçage, pour reteindre ensuite les planches individuellement (5 teintes différentes). Même traitement pour les bancs.
I built this kitchen island to save money, but I did not count my time (3 weeks of hard work and you have to be experienced). I first selected the best boards from 20 pallets, then flattening, sandblasting and planning.
J'ai construit un îlot de cuisine en planche de palettes, la raison ? Pour sauver de l'argent , mais je n'avais pas compter mon temps (3 semaines de travail avec quelques outils et une certaine expérience) j'ai du défaire environ 20 palettes et faire la sélection des planche les plus droite, les planer, les sabler et les dégauchir, cet un bois coriace donc j'ai du percer et visser a chaque foie pour l'assemblage, le dessus ma pris 3 jours a fabriquer, 192 mcx de 5/8 x 3 1/2 x 18" que j'ai du planés a 1/2 ", coupés a 16 ", délignés a 1 1/2 " et collés ( comptoir , 1 1/2 x 30 x 62 " ). Les poignées, charnières, railles coulissantes, visses, papier sablé sont les seuls chose que j'ai du acheter.
I used pallet and repurposed wood for the shelf space. I sanded and stained the pallet with red mahogany and painted black stripes on the pallet. Once the paint and stain dried I applied a clear glossy coat. This was made for a fundraiser, and it led to many other orders!
Here's 3 Fun Pallet Ideas - a Pallet Serving Tray and Birdhouses
Hello there - greetings from Amazing Thailand! What a fantastic site - and what amazingly talented and imaginative crafters we have here! I've always had an interest in recycling, and ever since I started using Pinterest, I keep seeing these awesome pallet wood creations. I've been chomping at the bit to get started.
Pallet Serving Tray:
I couldn't find large serving trays anywhere in Thailand, so I thought this was an excellent opportunity to see how I could use some of my pallet wood to make one.
The tray for serving measures approximately 24 inches long and doesn't have sides - at the moment. I may add some later if things keep falling off. I used two pieces of pallets that have the forklift openings as the handles and did some decorative carving along the tops of the handles. I sanded it all smooth.
Birdhouses:
The two small bird houses I designed primarily because my long-suffering missus has been nagging me for EVER about making some birdhouses, so I got busy, and here we are. They're not fancy, but I've got the bug now so they will become more ornate as time goes by.
Birdhouse No. 1 features a heart-shaped perch while Birdhouse No. 2 features a ring perch below. Both openings into the houses have been drilled out and then sanded smooth to protect bird-feet. Same with the perch areas.
Please feel free to comment or offer advice on my efforts - positive or negative - I'm old enough to take it on the chin so don't hold back!
This stunning, one-of-a-kind pallet dining table was a labor of love!
How I did this dining table:
First, I cut apart my pallets. I then planed the boards to a uniform thickness.
FYI: Use caution with pallet boards before planing or jointing. Ensure you remove ALL the metal fasteners (staples, nails, screws).
I pieced the boards together, mixing wood tones and grain directions for interest. I repeated the process for the sturdy, wide table bases. The table measures 3.5' x 8'.
This pallet dining table can comfortably seat ten people.
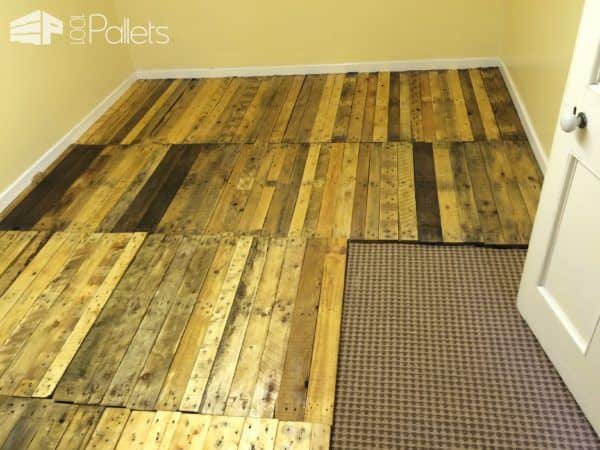
A Removable Pallet Kitchen Floor?!? YES! Here's a brilliant, budget-friendly, temporary fix for a serious foundation leak. A friend wanted a new kitchen floor. However, they have a constant leak coming from under the foundation. We were limited to what we could use due to the moisture. Both laminate and tiles would have eventually pushed up due to the water. I designed a temporary "rustic " pallet floor for her. I designed this removable pallet kitchen floor in a way that it could easily lift up when it's time to work on the leak.
Here's how we made a Removable Pallet Kitchen Floor:
We used a total of 16 pallets to cover approximately 12-14 square meters. The hardest part was removing and fitting the pallets in place to fit in between the walls.
First, we dry-fitted the pallet slats into the area we wanted to cover. When we had them all laid out the way we wanted, we then removed them. We put a plastic barrier sheet down, and then made a three-plank base - also pallet wood - to keep the floating floor at least 2.5cm from the ground. We secured the slats in place with 30x4 wood screws. We used about three boxes of them to make this floor! We didn't do a lot of fancy sanding or anything like that. This is only a temporary fix, after all.
We finished the planks with 5 liters (used 2 of the 2.5L containers) of satin-finish yacht paint to prevent water from getting into the wood if it leaks again. We didn't put pallet flooring down in front of the door, as the raised height would have made us modify the door. We think it's a very good idea until the causative problem can be addressed the way it needs to be. It'll make the room usable again!
 These kitchen items were made from recycled wooden pallets. The lights were made from small pallets then we added a […]
 Kitchen table made out of repurposed wooden pallets.
 100% pallets / meuble tout en palette 😉
 Coffee or Tea mug holder for the wall of my kitchen made from 2 repurposed pallets.


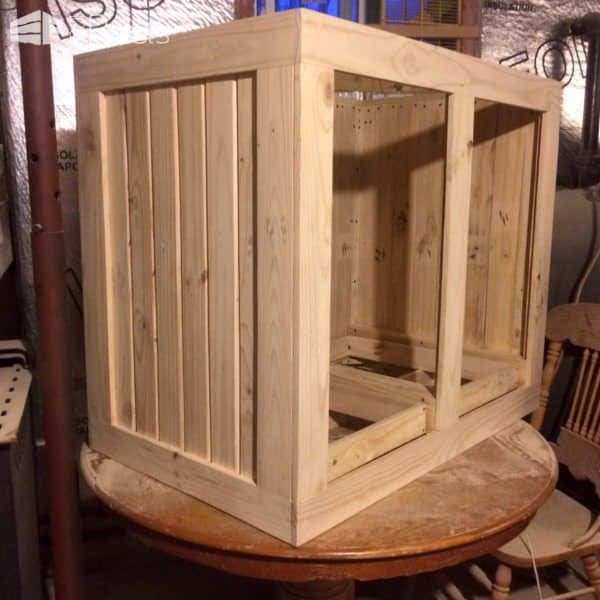
 Made these gates from repurposed pallets to confine my puppies to the kitchen while we are out.


 Here is a simple construction of pallet wood to build a shelve for the Kitchen. I made it in an […]


 This is our simple pallet table and chair in the cottage. Greetings from Hungary-Börzsöny Hill!


 Simple spice rack made with about 1/3 of a wooden pallet.


 A Belfast Sink on Gumtree for 20 quid started it all… Then, a weeks solid graft, several pallets (and other […]


 This sideboard was made with one pallet only. The rough parts for the structure painted in blue and the rest […]